Development Environment
Before you begin the tutorials, you need to install the following tools and frameworks.
Please note that if you are solely interested in learning smart contract development, you only need to install the .NET SDK. Other tools are used to start aelf nodes, publish contracts, and more. The installation of these tools is optional, and you can install them as needed.
For most of these dependencies, we provide command-line instructions for macOS, Linux (Ubuntu 18), and Windows. If you encounter any issues or have more complex requirements, please leave a message on GitHub, and we will address them as soon as possible.
macOS
Configure Environment
You can install and set up the development environment on macOS computers with either Intel or Apple M1/M2 processors. This will take 10-20 minutes.
Before You Start
Before you install and set up the development environment on a macOS device, please make sure that your computer meets these basic requirements:
Operating system version is 10.7 Lion or higher.
At least a 2Ghz processor, 3Ghz recommended.
At least 8 GB RAM, 16 GB recommended.
No less than 10 GB of available space.
Broadband internet connection.
Support for Apple M1
If you use a macOS computer with an Apple M1 chip, you need to install Apple Rosetta. Open the Terminal on your computer and execute this command,Please be patient while the command is executed.
/usr/sbin/softwareupdate --install-rosetta --agree-to-license
Install Homebrew
In most cases, you should use Homebrew to install and manage packages on macOS devices. If Homebrew is not installed on your local computer yet, you should download and install it before you continue.
To install Homebrew:
Open Terminal.
Execute this command to install Homebrew:
/bin/bash -c "$(curl -fsSL https://raw.githubusercontent.com/Homebrew/install/HEAD/install.sh)"
Execute this command to check if Homebrew is installed:
brew --version
The following output suggests successful installation:
Homebrew 3.3.1

Homebrew/homebrew-core (git revision c6c488fbc0f; last commit 2021-10-30)

Homebrew/homebrew-cask (git revision 66bab33b26; last commit 2021-10-30)
Environment Update
Execute this command to update your environment:
brew update
You will see output like this.
You have xx outdated formula installed.
You can upgrade it with brew upgrade
or list it with brew outdated.
You can execute the following command to upgrade or skip to the installation of Git.
brew upgrade
Install Git
If you want to use our customized smart contract development environment or to run a node, you need to clone aelf’s repo (download source code). As aelf’s code is hosted on GitHub, you need to install Git first.
Execute this command in Terminal:
brew install git
Execute this command to check if Git is installed:
git --version
The following output suggests successful installation:
git version xx.xx.xx
Install .NET SDK
As aelf is mostly developed with .NET Core, you need to download and install .NET Core SDK (Installers - x64 recommended for macOS devices with Intel processors; Installers - Arm64 recommended for macOS devices with M1 chips).
Download and install .NET 6.0 which is currently used in aelf’s repo.
Please reopen Terminal after the installation is done.
Execute this command to check if .NET is installed:
dotnet --version
The following output suggests successful installation:
6.0.403
Install protoBuf
Execute this command to install protoBuf:
brew install protobuf
If it shows error
Permission denied @ apply2files, then there is a permission issue. You can solve it using the following command and then redo the installation with the above command:sudo chown -R $(whoami) $(brew --prefix)/*
Execute this command to check if protoBuf is installed:
protoc --version
The following output suggests successful installation:
libprotoc 3.21.9
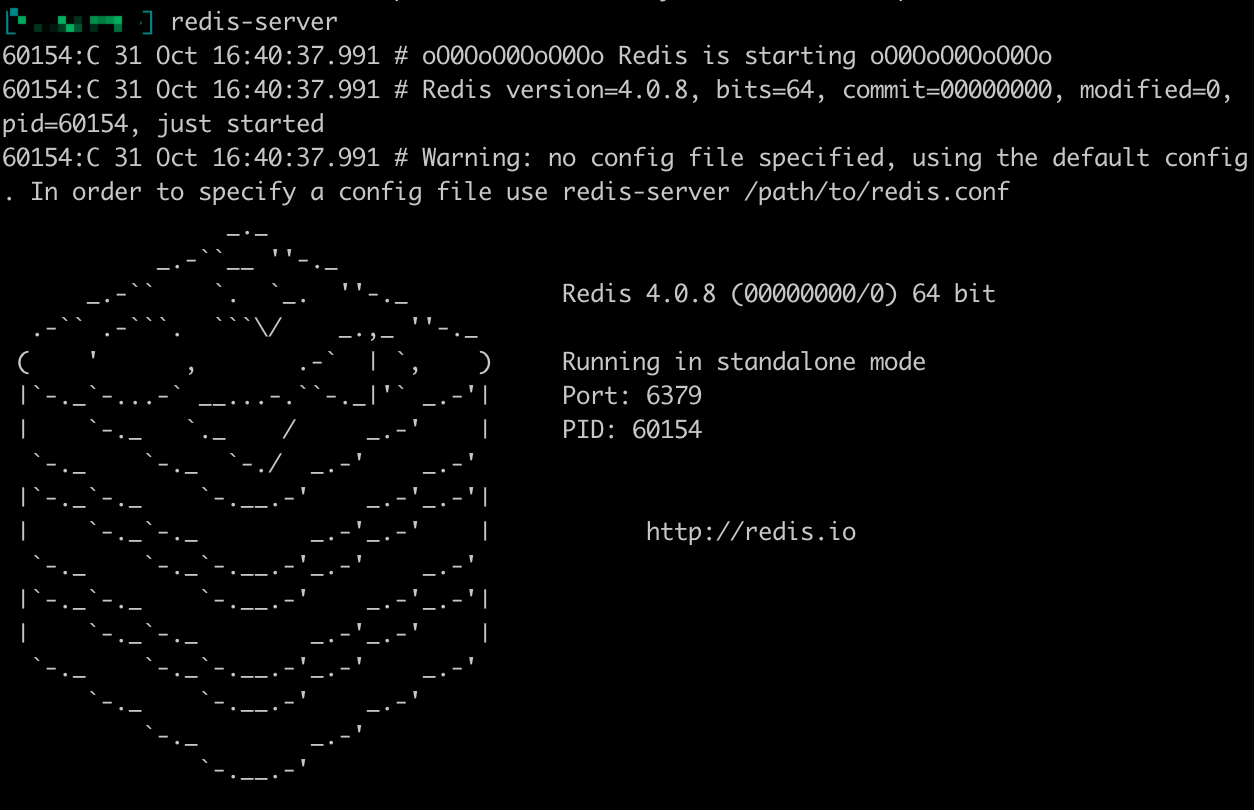
Install Redis
Execute this command to install Redis:
brew install redis
Execute this command to start a Redis instance and check if Redis is installed:
redis-server
The following output suggests Redis is installed and a Redis instance is started:

Install Nodejs
Execute this command to install Nodejs:
brew install node
Execute this command to check if Nodejs is installed:
npm --version
The following output suggests successful installation:
6.14.8
Install aelf-command
Execute this command to install aelf-command:
npm i aelf-command -g
If it shows error
Permission denied @ apply2files, then there is a permission issue. You can solve it using the following command and then redo the installation with the above command:sudo chmod 755 /usr/local/lib/node_modules
Create an aelf Account
Execute this command:
aelf-command create
An aelf account will be automatically created and you will see info like:
AElf [Info]: Your wallet info is :
AElf [Info]: Mnemonic            : mirror among battle muffin cattle plunge tuition buzz hip mad surround recall
AElf [Info]: Private Key         : 4bf625afea60e21aa5afcab5ea682b3dfb614941245698632d72a09ae13*****
AElf [Info]: Public Key          : 04f9bb56a9eca921bd494e677307f0279c98f1d2ed6bdeaa6dd256878272eabd14e91ec61469d2a32ce5e63205930dabdc0b9f13fc80c1f4e31760618d182*****
AElf [Info]: Address             : 21qciGwcaowwBttKMjMk86AW6WajhcodSHytY1vCyZb7p*****
You will then be asked whether you want the account data stored as a json file. Enter
yto confirm and the file will be stored in/Users/{username}/.local/share/aelf/keys/.
Please make sure you remember the account data or the json file’s location.
You will be required to set a password (referred to as * here):
Enter a password: ********
Confirm password: ********
For the sake of convenience, you are encouraged to keep this Terminal on the account info interface and open another Terminal to continue the following.
Linux
Configure Environment
You can install and set up the development environment on computers running 64-bit Linux. This will take 10-20 minutes.
Before You Start
Before you install and set up the development environment on a Linux device, please make sure that your computer meets these basic requirements:
Ubuntu 18.
Broadband internet connection.
Update Environment
Execute this command to update your environment, Please be patient while the command is executed:
sudo apt-get update
The following output suggests successful update:
Fetched 25.0 MB in 3s (8,574 kB/s)
Reading package lists... Done
Install Git
If you want to use our customized smart contract development environment or to run a node, you need to clone aelf’s repo (download source code). As aelf’s code is hosted on GitHub, you need to install Git first.
Open the terminal.
Execute this command to install Git:
sudo apt-get install git -y
Execute this command to check if Git is installed:
git --version
The following output suggests successful installation:
git version 2.17.1
Install .NET SDK
As aelf is mostly developed with .NET Core, you need to download and install .NET Core SDK.
Execute the following commands to install .NET 6.0.
Execute this command to download .NET packages:
wget https://packages.microsoft.com/config/ubuntu/22.04/packages-microsoft-prod.deb -O packages-microsoft-prod.deb
Execute this command to unzip .NET packages:
sudo dpkg -i packages-microsoft-prod.deb

rm packages-microsoft-prod.deb
Execute this command to install .NET:
sudo apt-get update && \

sudo apt-get install -y dotnet-sdk-6.0
Execute this command to check if .NET 6.0 is installed:
dotnet --version
The following output suggests successful installation:
6.0.403
Install protoBuf
Before you start the installation, please check the directory you use and execute the following commands to install.
Execute the following commands to install protoBuf.
Execute this command to download protoBuf packages:
curl -OL https://github.com/google/protobuf/releases/download/v21.9/protoc-21.9-linux-x86_64.zip
Execute this command to unzip protoBuf packages:
unzip protoc-21.9-linux-x86_64.zip -d protoc3
Execute these commands to install protoBuf:
sudo mv protoc3/bin/* /usr/local/bin/

sudo mv protoc3/include/* /usr/local/include/

sudo chown ${USER} /usr/local/bin/protoc

sudo chown -R ${USER} /usr/local/include/google
Execute this command to check if protoBuf is installed:
protoc --version
The following output suggests successful installation:
libprotoc 3.21.9
Install Redis
Execute this command to install Redis:
sudo apt-get install redis -y
Execute this command to start a Redis instance and check if Redis is installed:
redis-server
The following output suggests Redis is installed and a Redis instance is started:
Server initialized
Ready to accept connections
You can open a new terminal and use redis-cli to start Redis command line. The command below can be used to clear Redis cache (be careful to use it):
flushall
Install Nodejs
Execute these commands to install Nodejs:
curl -fsSL https://deb.nodesource.com/setup_14.x | sudo -E bash -

sudo apt-get install -y nodejs
Execute this command to check if Nodejs is installed:
npm --version
The following output suggests successful installation:
6.14.8
Install aelf-command
Execute this command to install aelf-command:
npm i aelf-command -g
If it shows error
Permission denied @ apply2files, then there is a permission issue. You can solve it using the following command and then redo the installation with the above command:sudo chmod 755 /usr/local/lib/node_modules
Create an aelf Account
Execute this command:
aelf-command create
An aelf account will be automatically created and you will see info like:
AElf [Info]: Your wallet info is :
AElf [Info]: Mnemonic            : mirror among battle muffin cattle plunge tuition buzz hip mad surround recall
AElf [Info]: Private Key         : 4bf625afea60e21aa5afcab5ea682b3dfb614941245698632d72a09ae13*****
AElf [Info]: Public Key          : 04f9bb56a9eca921bd494e677307f0279c98f1d2ed6bdeaa6dd256878272eabd14e91ec61469d2a32ce5e63205930dabdc0b9f13fc80c1f4e31760618d182*****
AElf [Info]: Address             : 21qciGwcaowwBttKMjMk86AW6WajhcodSHytY1vCyZb7p*****
You will then be asked whether you want the account data stored as a json file. Enter
yto confirm and the file will be stored in/Users/{username}/.local/share/aelf/keys/.
Please make sure you remember the account data or the json file’s location.
You will be required to set a password (referred to as * here):
Enter a password: ********
Confirm password: ********
For the sake of convenience, you are encouraged to keep this Terminal on the account info interface and open another Terminal to continue the following.
Windows
Configure Environment
You can install and set up the development environment on computers running Windows 10 or higher. This will take 10-20 minutes.
Before You Start
Before you install and set up the development environment on a Windows device, please make sure that your computer meets these basic requirements:
Operating system version is Windows 10 or higher.
Broadband internet connection.
Install Chocolatey (Recommended)
Chocolatey is an open-source package manager for Windows software that makes installation simpler, like Homebrew for Linux and macOS. If you don’t want to install it, please use the provided download links for each software to complete their installation.
Open cmd or PowerShell as administrator (Press Win + x).
Execute the following commands in order and enter y to install Chocolatey, Please be patient while the command is executed:
Set-ExecutionPolicy AllSigned

Set-ExecutionPolicy Bypass -Scope Process

Set-ExecutionPolicy Bypass -Scope Process -Force; iex ((New-Object System.Net.WebClient).DownloadString('https://chocolatey.org/install.ps1'))

Set-ExecutionPolicy RemoteSigned
Execute this command to check if Chocolatey is installed:
choco
The following output suggests successful installation:
Chocolatey vx.x.x
If it
showsThe term 'choco' is not recognized as the name of a cmdlet, function, script file, or operable program,
then there is a permission issue with PowerShell. To solve it:
Right-click the computer icon and select Properties.
Click Advanced in System Properties and select Environment Variables on the bottom right.
Check if the ChocolateyInstall variable is in System variables, and its default value is the Chocolatey installation path
C:\Program Files\Chocolatey. If you don’t find it, click New System Variable to manually add it.
Install Git
If you want to use our customized smart contract development environment or to run a node, you need to clone aelf’s repo (download source code). As aelf’s code is hosted on GitHub, you need to install Git first.
You can download Git through this link or execute this command in cmd or PowerShell:
choco install git -y
Execute this command to check if Git is installed:
git --version
The following output suggests successful installation:
git version xx.xx.xx
If it shows
The term 'git' is not recognized as the name of a cmdlet, function, script file, or operable program,
you can:
Right-click the computer icon and select Properties.
Click Advanced in System Properties and select Environment Variables on the bottom right.
Check if the Git variable is in Path in System variables, and its default value is the Git installation path
C:\Program Files\git. If you don’t find it, click New System Variable to manually add it.
Install .NET SDK
As aelf is mostly developed with .NET Core, you need to download and install .NET Core SDK (Installers - x64 recommended for Windows devices).
Download and install .NET 6.0 which is currently used in aelf’s repo.
Please reopen cmd or PowerShell after the installation is done.
Execute this command to check if .NET is installed:
dotnet --version
The following output suggests successful installation:
6.0.403
Install protoBuf
You can download protoBuf through this link or execute this command in cmd or PowerShell:
choco install protoc --version=3.11.4 -y

choco install unzip -y
Execute this command to check if protoBuf is installed:
protoc --version
The following output suggests successful installation:
libprotoc 3.21.9
Install Redis
You can download Redis through MicroSoftArchive-Redis or execute this command in cmd or PowerShell:
choco install redis-64 -y
Execute this command to start a Redis instance and check if Redis is installed:
memurai
The following output suggests Redis is installed and a Redis instance is started:
Install Nodejs
You can download Nodejs through Node.js or execute this command in cmd or PowerShell:
choco install nodejs -y
Execute this command to check if Nodejs is installed:
npm --version
The following output suggests successful installation:
6.14.8
If it shows The term ‘npm’ is not recognized as the name of a cmdlet, function, script file, or operable program, you can:
Right-click the computer icon and select Properties.
Click Advanced in System Properties and select Environment Variables on the bottom right.
Check if the Nodejs variable is in Path in System variables, and its default value is the Nodejs installation path
C:\Program Files\nodejs. If you don’t find it, click New System Variable to manually add it.
Install aelf-command
Execute this command to install aelf-command:
npm i aelf-command -g
If it shows error
Permission denied @ apply2files, then there is a permission issue. You can solve it using the following command and then redo the installation with the above command:sudo chmod 755 /usr/local/lib/node_modules
Create an aelf Account
Execute this command:
aelf-command create
An aelf account will be automatically created and you will see info like:
AElf [Info]: Your wallet info is :
AElf [Info]: Mnemonic            : mirror among battle muffin cattle plunge tuition buzz hip mad surround recall
AElf [Info]: Private Key         : 4bf625afea60e21aa5afcab5ea682b3dfb614941245698632d72a09ae13*****
AElf [Info]: Public Key          : 04f9bb56a9eca921bd494e677307f0279c98f1d2ed6bdeaa6dd256878272eabd14e91ec61469d2a32ce5e63205930dabdc0b9f13fc80c1f4e31760618d182*****
AElf [Info]: Address             : 21qciGwcaowwBttKMjMk86AW6WajhcodSHytY1vCyZb7p*****
You will then be asked whether you want the account data stored as a json file. Enter
yto confirm and the file will be stored in/Users/{username}/.local/share/aelf/keys/.
Please make sure you remember the account data or the json file’s location.
You will be required to set a password (referred to as * here):
Enter a password: ********
Confirm password: ********
For the sake of convenience, you are encouraged to keep this Terminal on the account info interface and open another Terminal to continue the following.
Codespaces
A codespace is an instant development environment that’s hosted in the cloud. It provides users with general-purpose programming languages and tooling through containers. You can install and set up the development environment in Codespaces. This will take 10-20 minutes. Please be patient while the command is executed.
Basic Environment Configurations
Visit AElfProject / AElf via a browser.
Click the green Code button on the top right.
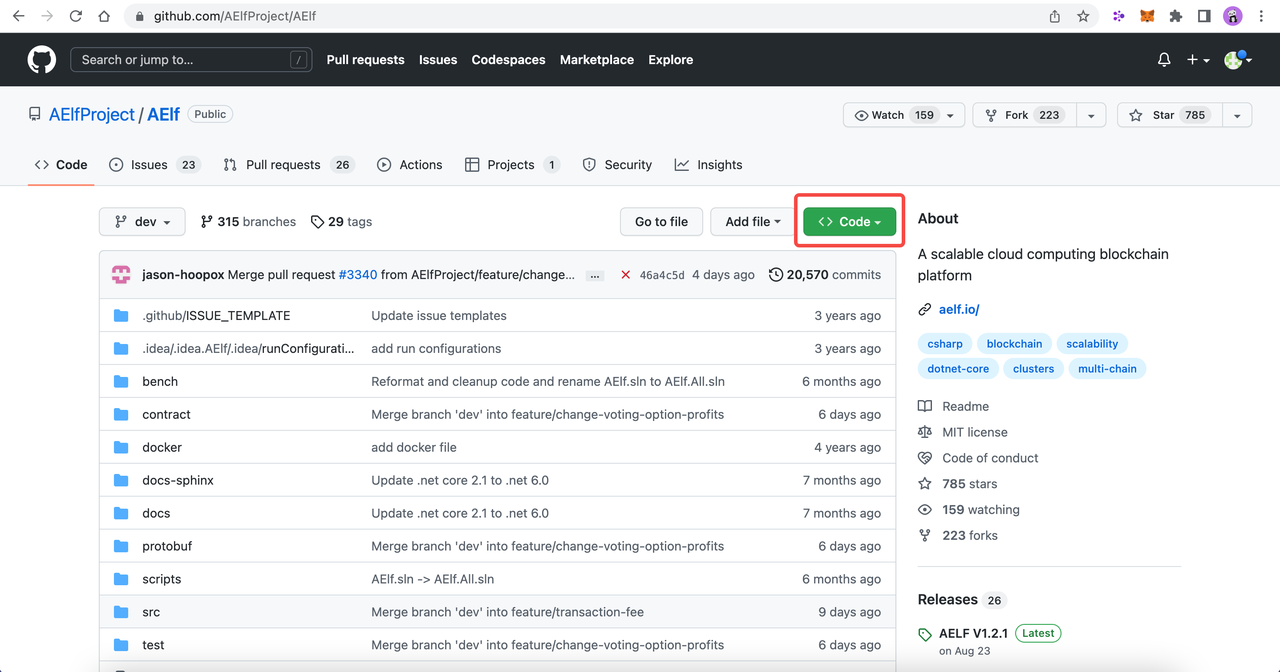
Select
Codespacesand click +.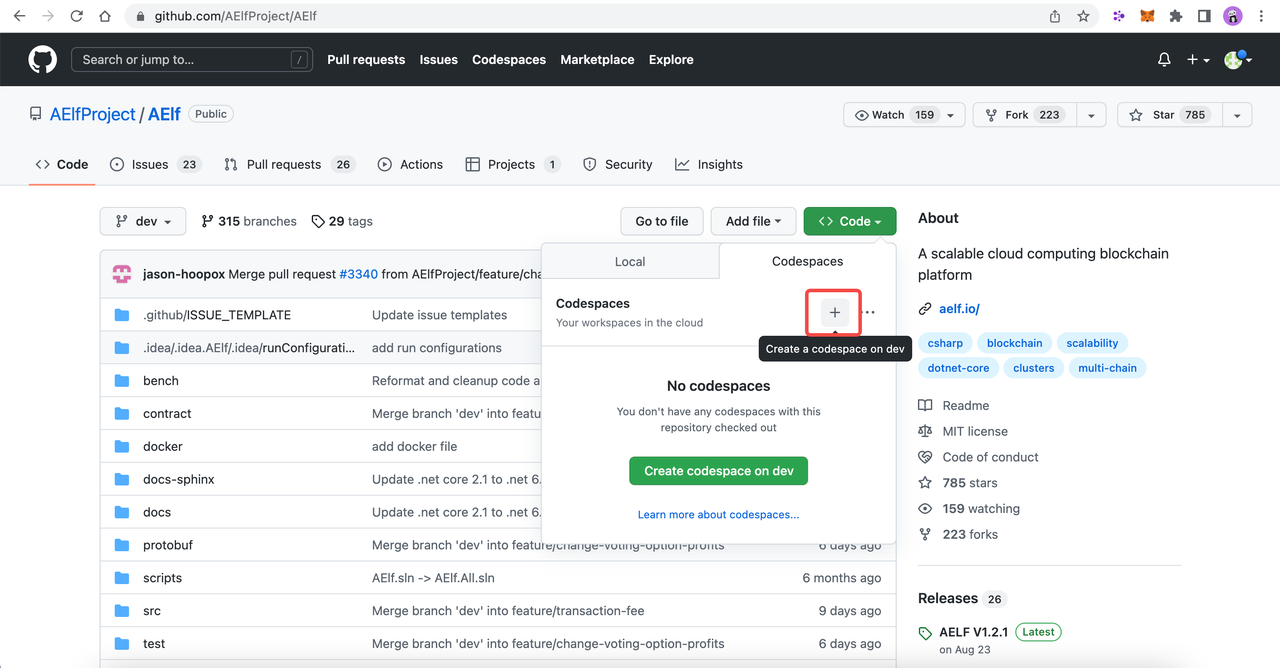
Then a new tab will be opened that shows the Codespaces interface.
After the page is loaded, you will see:
The left side displays all the content in this repo.
The upper right side is where you can write code or view text.
The lower right side is a terminal where you can build and run code (If the terminal doesn’t open by default, you can click the hamburger menu on the top left and select Terminal -> New Terminal, or press control + shift + ` on your keyboard).
Currently, Codespaces have completed the configuration for part of
the environments, yet there are some you need to manually configure.
At the time of writing, Codespaces have done the configuration for
git and nodejs. You can type the following commands to check their
versions:
# git version 2.25.1
git --version

# 8.19.2
npm --version
Update Environment
Execute this command to update your environment:
sudo apt-get update
The following output suggests successful update:
Fetched 25.0 MB in 3s (8,574 kB/s)
Reading package lists... Done
Install .NET SDK
.NET SDK 7.0 is used in this repo. Hence, you need to reinstall v6.0 otherwise there will be building issues.
Execute this command to check if v7.0 is used:
# 7.0.100
dotnet --version
If there is v7.0, execute this command to delete it:
sudo rm -rf /home/codespace/.dotnet/*
Execute this command to reinstall v6.0:
wget https://packages.microsoft.com/config/ubuntu/22.04/packages-microsoft-prod.deb -O packages-microsoft-prod.deb

sudo dpkg -i packages-microsoft-prod.deb

rm packages-microsoft-prod.deb

sudo apt-get update && \

sudo apt-get install -y dotnet-sdk-6.0
Restart bash after the installation and execute this command to check if v6.0 is installed:
# 6.0.403
dotnet --version
The following output suggests successful installation:
6.0.403
Install protoBuf
Execute this command to install protoBuf:
curl -OL https://github.com/google/protobuf/releases/download/v21.9/protoc-21.9-linux-x86_64.zip
unzip protoc-21.9-linux-x86_64.zip -d protoc3

sudo mv protoc3/bin/* /usr/local/bin/

sudo mv protoc3/include/* /usr/local/include/

sudo chown ${USER} /usr/local/bin/protoc

sudo chown -R ${USER} /usr/local/include/google
Execute this command to check if protoBuf is installed:
protoc --version
The following output suggests successful installation:
libprotoc 3.21.9
Install Redis
Execute this command to install Redis:
sudo apt-get install redis -y
Execute this command to start a Redis instance and check if Redis is installed:
redis-server
The following output suggests Redis is installed and a Redis instance is started:
Server initialized
Ready to accept connections
Install aelf-command
Execute npm command to install aelf-command:
npm i aelf-command -g
Create an aelf Account
Execute this command:
aelf-command create
An aelf account will be automatically created and you will see info like:
AElf [Info]: Your wallet info is :
AElf [Info]: Mnemonic            : mirror among battle muffin cattle plunge tuition buzz hip mad surround recall
AElf [Info]: Private Key         : 4bf625afea60e21aa5afcab5ea682b3dfb614941245698632d72a09ae13*****
AElf [Info]: Public Key          : 04f9bb56a9eca921bd494e677307f0279c98f1d2ed6bdeaa6dd256878272eabd14e91ec61469d2a32ce5e63205930dabdc0b9f13fc80c1f4e31760618d182*****
AElf [Info]: Address             : 21qciGwcaowwBttKMjMk86AW6WajhcodSHytY1vCyZb7p*****
You will then be asked whether you want the account data stored as a json file. Enter
yto confirm and the file will be stored in/Users/{username}/.local/share/aelf/keys/.
Please make sure you remember the account data or the json file’s location.
You will be required to set a password (referred to as * here):
Enter a password: ********
Confirm password: ********
For the sake of convenience, you are encouraged to keep this Terminal on the account info interface and open another Terminal to continue the following.